
Hello there everyone and welcome to another challenge here at A Passion For Papertrey. One of the techniques we are all big fans of here is the use of negative die cuts or apertures on a card and with all the dies available out there there is so much you can do with this design feature. You can layer patterned papers, vellum (as both Aimes and I did on our cards for the last challenge), stamped images etc or create frames within frames, add embellishments (buttons, gems and so on). So let you creative juices get flowing and show some negativity (in a positive way!!!)
I made this card for Dad’s birthday which he celebrated last week. I struggle so much with masculine cards so they often get put off and put off which then leaves me panicking at the last minute!! One of my go-to masculine sets from PTI is Grunge Me. I recently picked up the dies that pair with the Pretty Peonies anniversary set from last year and really love the retro feel of the font used on the “Happy” die. I thought it made a good partnership with some of the designs in Grunge Me so I started with that and it went from there.
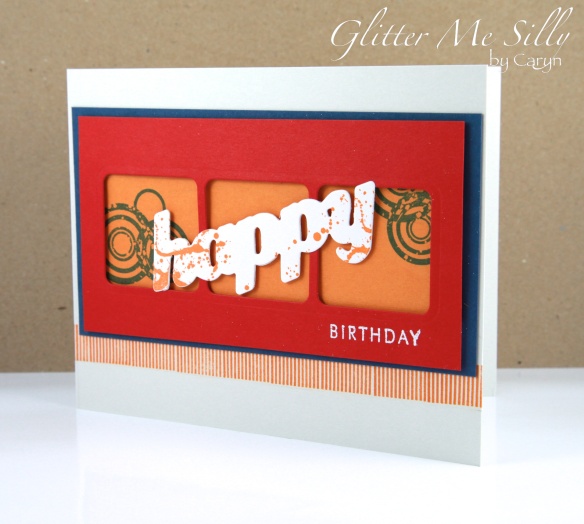
{Happy Birthday}
Stamps: Grunge Me, Pretty Peonies
Ink: Enchanted Evening, Orange Zest, Versamark
Cardstock: Soft Stone, Enchanted Evening, Orange Zest, Pure Poppy
Tools: Pretty Peonies die collection, Take Three die, white filigree embossing powder
Over to Kate: : “A very dear family friend passed away last week and so I had a few sympathy cards to make. I was searching for inspiration and decided to use our challenge as a kick-start. I die-cut the butterfly and adhered some bitty dots paper to the rear of my cream mat. Those who know me know I’m not exactly a fan of purple but it definitely works for a sympathy card doesn’t it..”
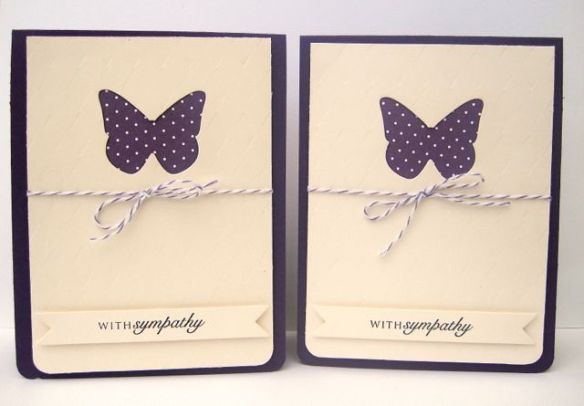
With Sympathy:
Stamps: Round and Round
Card: Vintage Cream, Royal Velvet
Paper: 2008 Bitty Dots
Other: Argyle Impression Plate, Butterfly die, Purple Baker’s Twine,
Double-Ended Banners Die
Over to Aimes:
I created a frame for my negative card by using two dies. I simply ran the Mat Stack Die #4 on aqua mist cardstock, removed the die and then placed the Fillable Frames #7 die on the centre.

{Happy Happy Happy Birthday}
Stamps: Modern Basics (Papertrey Ink)
Ink: Tuxedo Black (Memento)
Cardstock: Stamper’s Select White, Aqua Mist, Soft Stone (Papertrey Ink)
Accessories: Mat Stack 4 Die, Fillable Frames 7 Die, Canvas and Linen Impression Plate, Yellow Button (Papertrey Ink)/Gold Foil (Glue Dots)/Grey Twine (Doodlebug)/Flower (Prima)/Pink Gems (Stash!)
I then simply added strips of super duper sticky tape to my frame and played with some gold foil that I purchased years ago. Funny how those old purchases have come full circle to be a supply I love again!
We’re looking forward to your fabulous creations! Remember: one randomly selected peep will win a $5 PTI gift certificate! The challenge ends at 9am GMT Monday April 8th. Full deets of our challenge rules can be found here.
We can’t wait to see what you come up with!
Caryn, Kate and Aimes xxx


Fab, fab fab cards!
All three cards are winners. Great inspiration, ladies
Lovely cards ladies – I love negative die cuts so if I have crafting time may try a few more, but needed to get an Easter card made this weekend. 🙂
Hi ladies 🙂
This is my first time entering here and I’m just loving negative die cuts at the mo’ so it’s the perfect challenge for me!! 🙂 Thanks for the lovely inspiration!! 🙂
hugs, Rachel x
Great inspiration girlies! Thanks for the challenge! Rach 🙂 xx